

Install web pages with Apache Name-based Virtual Hosts
A virtual host.
When you build many websites you want to have the opportunity to run them in one installation of Apache. A so-called virtualization of websites, if the term fits.
Apache has a design called Apache Virtual Hosts and a variant of it is Apache Name-based Virtual Hosts. It is the name-based variants we shall now see how to use.
#Prerequisites
You have a Debian server in VirtualBox as described in the VirtualBox guide.
#About Apache Virtual Hosts
Apache Virtual Hosts means that you can run many websites on one and the same installation of Apache. There is a variant called Apache Name-based Virtual Hosts which means that the same installation of Apache can host two (or more) websites with completely different domain names.
Take a look in Apaches documentation of Virtual Host and the part about Name-based Virtual Hosts.
Let’s get started.
#Installing Apache
We need the Apache web server and to install and start Apache run the two commands below on your Debian server.
sudo apt-get install apache2
sudo service apache2 status
You can test that the web server is running and responding by using a text-based browser lynx.
sudo apt-get install lynx
lynx http://localhost
Apache saves its log files in /var/log/apache2. In the file access.log, every request is logged to the site. The file error.log logs errors, for example if something in a configuration file prevents the server from being started.
You can start a tail -f command that prints lines at at the end of a log file. This can be a good way to check if something is written to the log. In order to look in the log files you have to be root. How to write to log content written to file error.log.
sudo tail -f /var/log/apache2/error.log
This is how it could look:
Now both Apache and the terminal browser lynx are in place.
In the default installation, Apache puts its config files in /etc/apache2/ and the web root is in /var/www/html/.
#Creating a Name-based Virtual Host
Now let’s create an Apache Name-based Virtual Host. Suppose we have a customer and we will create their website linux.dbwebb.se. But, we first want to test it in our own development environment, by running the same domain through a name-based virtual host in Apache.
#Create a config file for the virtual host
There is a directory /etc/apache2/sites-available where you put the config files for the virtual hosts you have. Then you enable the virtual hosts that Apache will use. Then the files are linked in the directory sites-enabled.
In the sites-available directory there is a config file that you can start from.
Follow these steps to enable a virtual name-based host for linux.dbwebb.se. I use nano as the text editor.
cd /etc/apache2/sites-available
sudo cp 000-default.conf linux.dbwebb.se.conf
sudo nano linux.dbwebb.se.conf
The finished file linux.dbwebb.se.conf might look like this with my own user mos. You may need to change the paths to suit your configuration and user.
<VirtualHost *:80>
    ServerAdmin mos@linux.dbwebb.se

    ServerName linux.dbwebb.se
    ServerAlias www.linux.dbwebb.se

    DocumentRoot /home/mos/vhosts/linux.dbwebb.se/htdocs

    ErrorLog  /home/mos/vhosts/linux.dbwebb.se/error.log
    CustomLog /home/mos/vhosts/linux.dbwebb.se/access.log combined

    <Directory />
        Options Indexes FollowSymLinks
        AllowOverride All
        Order allow,deny
        Allow from all
        Require all granted
    </Directory>
</VirtualHost>
So my virtual host should be in my home directory /home/mos under a directory structure in vhosts/linux.dbwebb.se. In that directory I set the web root to htdocs and the log files are directly in the directory.
Here’s how I finish.
mkdir $HOME/vhosts
mkdir $HOME/vhosts/linux.dbwebb.se
mkdir $HOME/vhosts/linux.dbwebb.se/htdocs
Now just enable the virtual host and have Apache reload the configuration.
sudo a2ensite linux.dbwebb.se
sudo service apache2 reload
#Troubleshoot the config file
If you encounter problems with the config file, you can look in the error log for error prints. Look at both /var/log/apache2 and the logs for the virtual host.
sudo tail -f /var/log/apache2/error.log
tail -f $HOME/vhosts/linux.dbwebb.se/error.log
You can also run the following commands to see the status of apache and its config file.
# Check status of apache
sudo service apache2 status

# Check configuration file for errors
apachectl configtest
apachectl -t

# List virtual hosts with settings
apachectl -S

# Stop and start the service
sudo service apache2 start
sudo apachectl start

sudo service apache2 stop
sudo apachectl stop
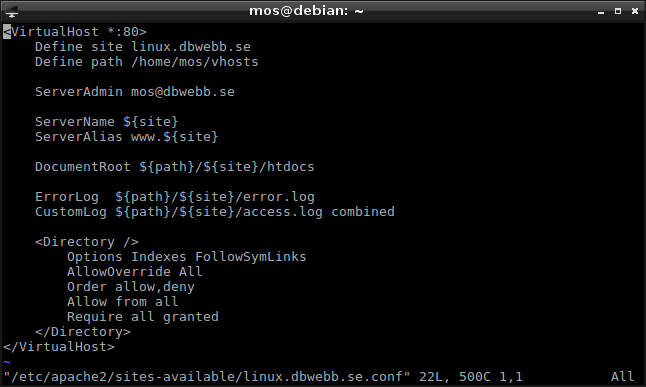
#A sleeker config file with variables
A variant of the config file could look like this, if you choose to use a form of alias variable available in the configuration file. In Apachian that would be Define.
<VirtualHost *:80>
    Define site linux.dbwebb.se
    Define path /home/mos/vhosts

    ServerAdmin mos@dbwebb.se

    ServerName ${site}
    ServerAlias www.${site}

    DocumentRoot ${path}/${site}/htdocs

    ErrorLog  ${path}/${site}/error.log
    CustomLog ${path}/${site}/access.log combined

    <Directory />
        Options Indexes FollowSymLinks
        AllowOverride All
        Order allow,deny
        Allow from all
        Require all granted
    </Directory>
</VirtualHost>
Try using this variant instead. As you can see, it is clearly easier to duplicate when you want to create new virtual hosts. You just need to change the two Define at the beginning of the file.
#Simulate a hostname for the server
You now have a virtual host that will respond as soon as it receives a call on the name linux.dbwebb.se. What you need to do is point the domain name at the server’s IP address.
Normally we do this with DNS. We add that the machine name is linked to an IP address and the DNS keeps track so we end up in the right place. If you do this example and have a server out there, you use the DNS to get it right.
But now we have a development environment with a server in VirtualBox that uses port forwarding for the network. So we need to set up locally, in our own network, that the machine linux.dbwebb.se is recognized as 127.0.0.1 and ends up on my server located in VirtualBox.
In my case, I access the web server, on my server, via the address http:// localhost:8080. I can now add an entry in my own computer’s name file. The file is called /etc/hosts on a Linux environment, and I add a new local computer name to the file like this.
sudo nano /etc/hosts
Add the following line to the file.
127.0.0.1 linux.dbwebb.se
On a client with MacOS, you do the same.
If you are on Windows 7, 8 or 10 the file is named as follows. Don’t forget that you need to be an administrator to edit the file.
C:\Windows\system32\drivers\etc\hosts
Now I can access the local machine by name instead. The address http: //linux.dbwebb.se: 8080 is now the same as typinghttp: // localhost: 8080 or http: //127.0.0.1: 8080. That’s exactly what Apache looks for when it identifies the name-based virtual host.
When I now use http: //linux.dbwebb.se: 8080, I come to Apache which identifies the name as a virtual host and uses the DocumentRoot specified.
Done. Magic!
If it does not work start by using the troubleshooting techninques described above.
#Finishing off
Name-based virtual hosting with Apache is a great way to run multiple websites on one server. It is also a great way to run a development server with many websites.
When, as we have done, you now combine this with services in VirtualBox, you get an opportunity to run many websites and to run them on many different servers that can be configured in different ways. It can be a powerful tool for a programmer.
#Revision history
- 2019-08-19: (A, efo, lew) Första utgåvan.

